Face Based Families – What’s wrong with them?

I hear this quite frequently “We don’t use face based families because…”.  However, I believe they are one of the best family types there are.

Common Misconceptions & Benefits:

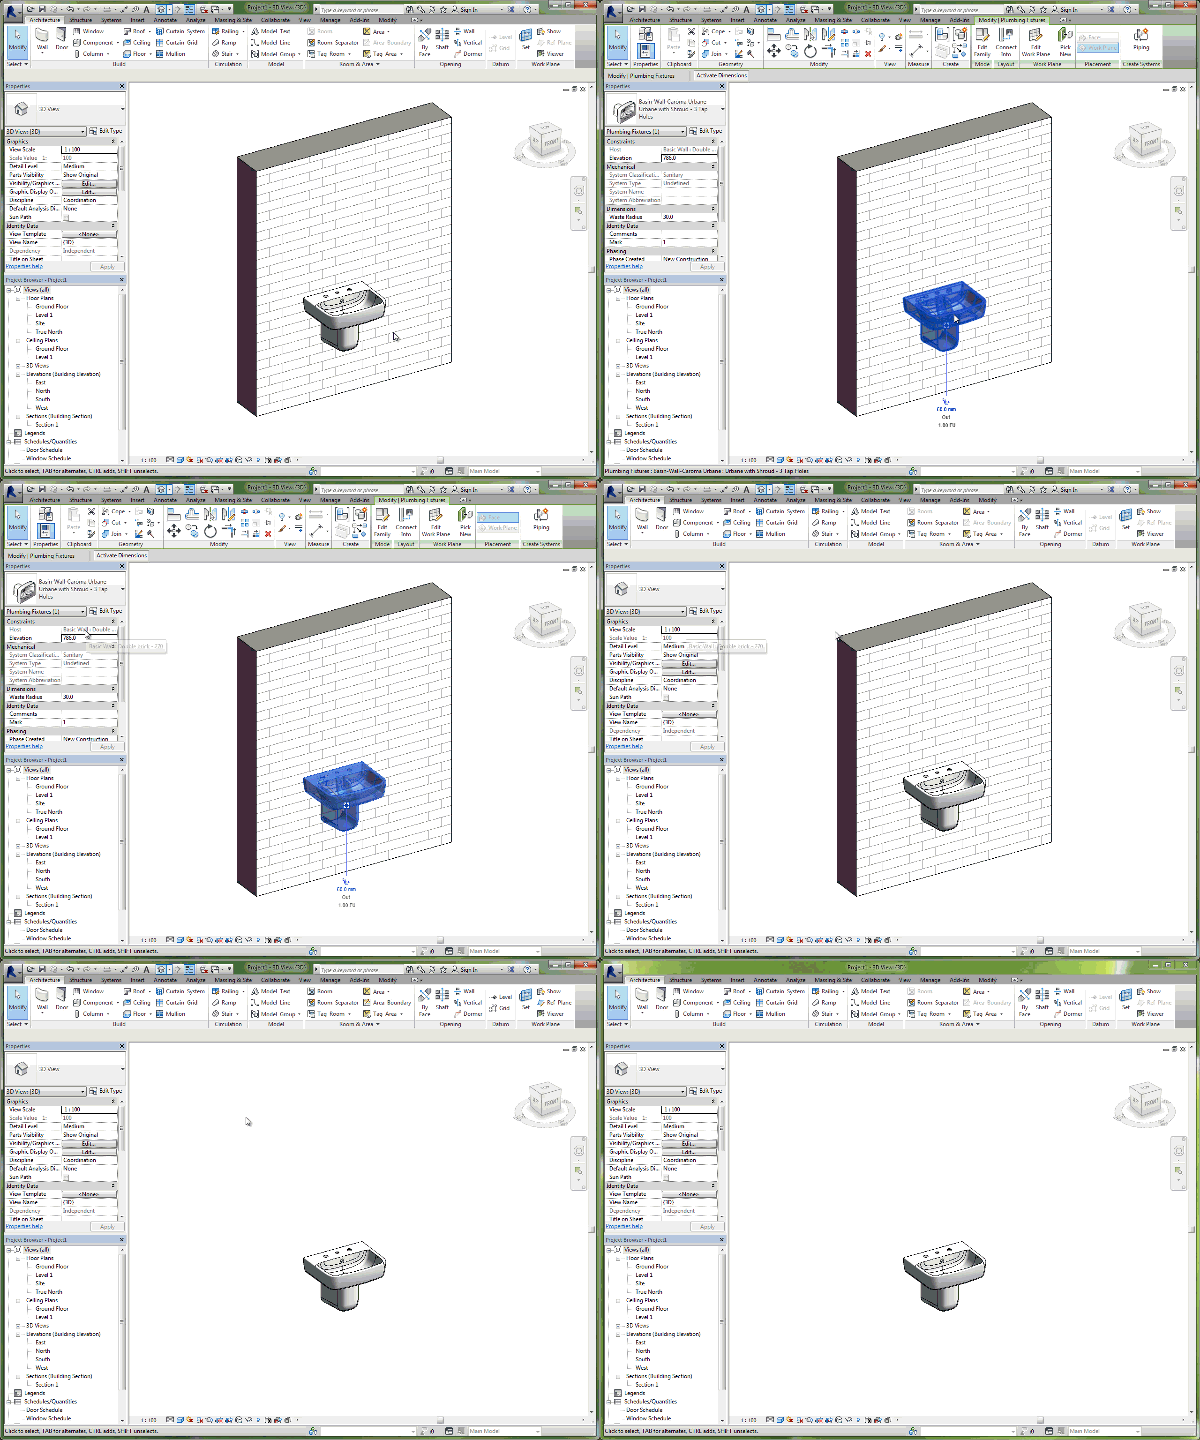
  • We don’t use face based families because when the host is deleted so is the element.  Below you can see this is completely untrue and in fact is one of the main benefits of a face based family:

Delete host of Face based family

  • This is only the case for wall, floor, ceiling, roof based families.  They are even more robust than an unhosted family with regards to hosts being deleted.  A non-hosted family is essentially level based, if you delete the level the family is deleted.  A face based family can be hosted to a face or a workplane, if you host a face based family to a level and delete the level, the family remains!
  • Why would you want to manually coordinate the alignment of a wall fixture with its wall if you don’t have to?  Yes you can create an alignment constraint, but these types of constraints are manual and too many can really start bogging down the performance of a your file.
  • They are flexibly as you can apply them to any face, so if my basin needs to be hosted by a piece of casework it can!
  • They are very easy to create and constrain in the family, there is no need to flex the thickness of the host element, as it doesn’t care about its thickness.
  • They can interact with their host automatically, such as cutting recesses or penetrations without losing their host
  • For vertical mounting you can specify default mounting heights, so when placed in  plan they are at the correct elevation on a vertical face.
  • Sometimes I will use an unhosted family with the workplane based option checked, this gives very similar functionality to a face based family, with one limitation – it can’t cut its host automatically, and one extra benefit, it has the “Always vertical” option.  This is really useful for creating pendant lights hosted to raked ceilings…
  • Sometimes people make the suggestion if you make it unhosted then the end user can choose to simply nest into a face based template and make it face based later if they want.  Sure they can, but it makes the file size larger, parameters need to be linked through, connectors need to be replaced in the host family… Its just extra work for no real benefit.
  • Face based families can be hosted to linked elements, so are very useful when worksharing.  You can also reconcile hosting if a linked is removed and replaced.

I hope this helps to dispel some of these misconceptions are people feel more comfortable using them.

Posted in Training | Tagged , , , | 3 Comments

Xrev – Autodesk Revit® Training

100% Revit modelling (Revit 2011)

Are you looking for high quality Autodesk Revit® training for your project team?

From People that can answer the hard questions – that are specific to the work you do?

From People that have experience working on projects like yours and know what the best approaches are to maximise efficiencies down the track as the design changes?

We offer classroom style training in your office on topics like:

  • Project Startup -Setting up the project right!
  • Documentation Best Practices
  • Model Sharing
  • Revit Stairs
  • Revit Railings
  • Revit System Families
  • Advanced Family Creation
  • Intermediate Family Creation
  • Introductory Family Creation
  • Managing Revit Systems
  • Revit Rendering
  • Adaptive and Curtain Panel Pattern Based Panels & mathematically based design
  • or customised topics of your choosing!

For as little as $800 +GST for a 3 hour in house classroom based training session (plus expenses), you get access to one of the most experienced Revit users in Australia.  Chris Price has been using Revit since 2001 and there isn’t much he hasn’t done with Revit, either by discipline, project typology, project stage, or deliverable!  You name it he’s done it, and most importantly successfully and well under budget.  You can see more about his experience here.

For a detailed breakdown on the sub-topics simply contact us with what you are interested in.

Posted in Services, Training | Tagged , , | Comments Off on Xrev – Autodesk Revit® Training

Conditional Statements – pushing the limits of Revit

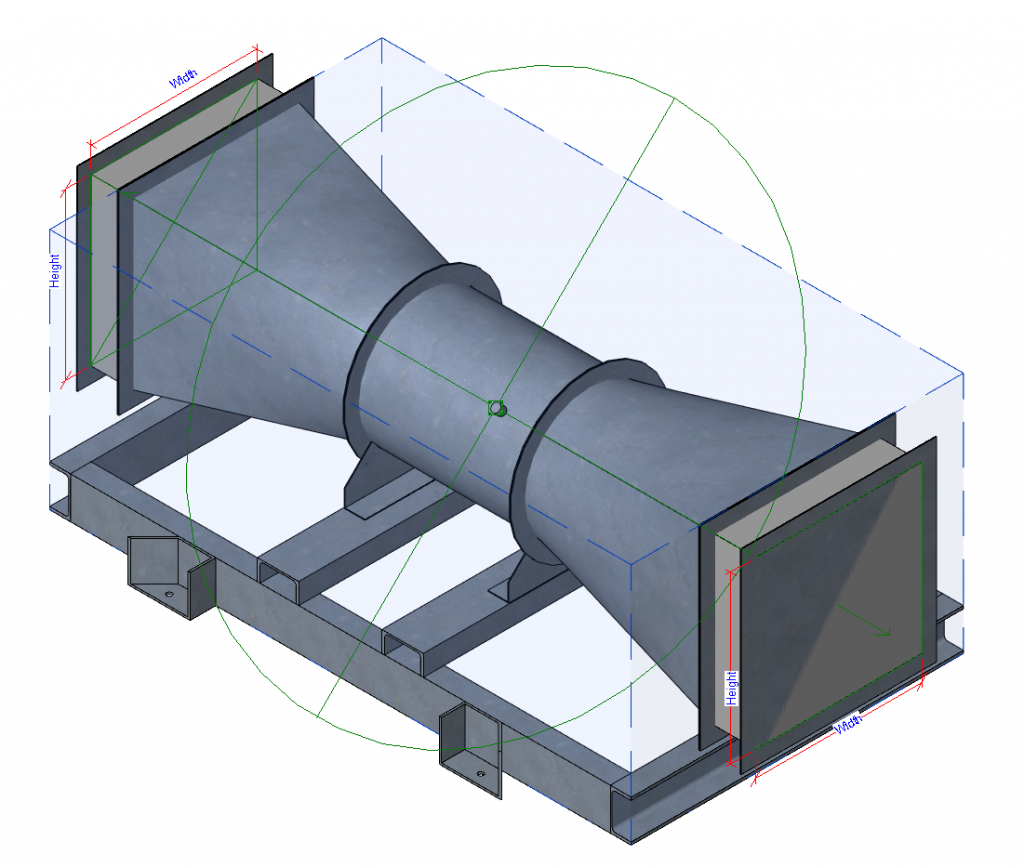
So last week I was tasked with create a duct mounted adjustable pitch axial flow fan.  I was told there were 672 variations permissable and provided a spreadsheet of sizes and a diagram explaining how it matched up.

Adjustable Pitch Axial Flow Fan

Sure I could have just generated a type catalog of the sizes, but then what’s to stop the end user going into the type and instance parameters and changing values, which may created unavailable combinations or worse, break the family because of invalid sizing combinations…

Solution: Conditional Statements

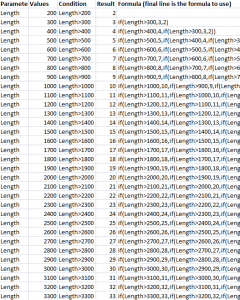
For those who have attended some of my RTC presentations you may have your own copy of my nested If Statement generator which I created in Excel as I have given it away to some attendees.  Below is an image of what it is.  Its not that complicated, just some concatenate formulas nested into each other…

Excel Revit IF Statement Generator

The big advantage is it doesn’t matter how many you nest into each other, just grab the bottom line and paste into Revit.

Revit Limitations

To tell the truth the previous maximum IF Statements I’ve tried is around 200, this time there were nearly 700, and many different parameters each requiring a formula of this complexity.   What I found was Revit would crash at around 580 conditional statements in a single formula…  Surely Autodesk should know someone would try and do this, lol!

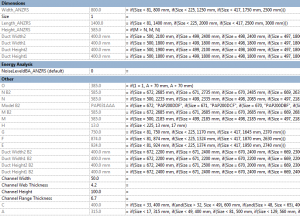
So how to get around this limitation, my first thought was to try and use “And” and “OR” conditions to try and reduce the number of required conditions.  However, this was going to be extremely tedious and there would still be 168+…  So then I decided to simply split across a couple of parameters.  EG: I had 500 conditions in one parameter then linked to a different parameter with the remaining conditions.  SOLVED!

Revit Formulas

I did note a large performance hit when changing parameters in the family editor.  Changing any values would take 5-15 seconds.  However, testing in a project and the changes are instant!  So not sure why performance is fine in a project.

I still created a type catalog of all 672 types to make it quick and easily to select the appropriate model.

I hope someone finds this useful!

Posted in Services | Tagged , , , | 3 Comments

Christmas/Holiday Period Software Roll outs

For most the lead up to the holiday period can be extremely hectic.  But if you plan things well, the holiday period can be the perfect time to roll out out new technology.  With reduced or zero staffing levels, it means IT can get that roll out perfect without impacting on anyone elses productivity.

Then kick back into it in January with some staff training and using the new systems with increased productivity!

If you can find the time, why not try out Xrev Transmit for your Revit Issuing & Transmittal generation?  See the benefits for yourself, so if you look into it soon, a holiday rollout could still be on the cards!

If you don’t have time for that contact us to organise an online demo at a time of your choosing.

Feel free to contact us with any questions you have, whether it be:

  • Installation/Deployments
  • Customising/Setting Up
  • Licensing & Costing
  • Troubleshooting

We are here to help, and rely on you to tell us when something isn’t working as expected so we can address it.

Posted in Uncategorized | Comments Off on Christmas/Holiday Period Software Roll outs

Xrev Transmit – New Features: November 2013

On Friday we released a new build with a couple of few minor new features which I wanted to elaborate on.

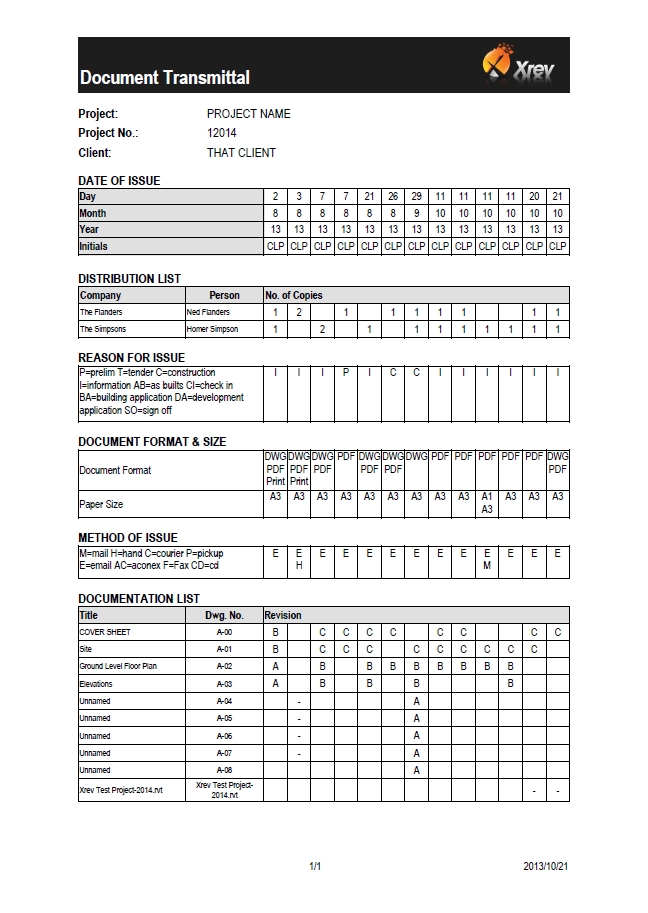
The Report Designer based Matrix Transmittal template now supports fields for “Current Revision” and “Document Count”.

Current Revision is very useful when you just want to see the most current revision for each document in a single column, rather than required a user to scroll back through the history to determine what the current revision is.

Document Count could be placed at the bottom of each Issue column, and gives you a quantity of exactly how many different sheets were issued.  This could be useful for the recipient to verify they have in fact received all the hard copies by doing a quick count of the sheets to see if it matches the “Document Count” total.

To use either of these fields in your Transmittal template, just drag and drop them on your report, to where you’d like them!

We have also implemented additional capabilities with our licensing.  Currently when you activate Xrev Transmit through the user interface the activation is only valid for that particular user.  This is because it would require administrator privileges for all user activation.

As installation is always completed in Administrator mode, we have now added the ability when using the command line installation (refer to our help file), to activate the software for all users.  Further work is planned to make this possible via the user interface as well…

Posted in New Features | Tagged , , , | Comments Off on Xrev Transmit – New Features: November 2013

Xrev Transmit – Webinar

17:00 – 18:00 (GMT0) Thursday 07th November 2013

09:00 – 10:00 (GMT-8) Thursday 07th November 2013

Register here

Join us to learn more about the latest version of the Autodesk Revit Productivity add-on: Xrev Transmit – for issuing and transmitting sheets from Revit.

Posted in Promotion | Tagged , , , | Comments Off on Xrev Transmit – Webinar

Xrev Transmit – Matrix Transmittals is here!

After many requests, and a lot of sleepless nights we’ve finally released the Matrix Transmittals version of Xrev Transmit.

Download Build 201x.3.5

Some of the feedback we’ve had so far:

“I downloaded the new Xrev Transmit 2014 its fantastic…!”

“The prospect of not having to complete another transmittal in excel again is very satisfying!”

“Very cool indeed!”

“I’ve just loaded the new Xrev Transmit, congratulations on the update the Matrix Transmittal is great”

“The Report Designer is great!  So easy to customise!”


Sample-Completed Transmittal


New features include:

  • Transmittal functionality has been restored for Revit 2014 however it is vastly improved, now supporting full history/matrix transmittals
  • We have implemented a very powerful Report Designer with a few templates to get you started.  We will be uploading videos in the coming days to explain how to use the new designer.  That said, its very intuitive, simply drag and drop to add a field to the report!
  • We’ve maintained support for Microsoft Word Templates on “per issue” templates, but you will need to make some minor tweaks to the field names.
  • Additional fields are now possible on the Transmittal.  EG: List out for each sheet, the scales on the sheet and the paper size
  • Recipient/Distribution List Creation/Management
  • We’ve added the ability to Manage Transmittals, for example if you make a mistake and need to delete one so it doesn’t display in the history…
  • Shift & Control Selection functionality has been implemented to make it that much quicker to select the information you want
  • Right Click “Copy to Selected” functionality has been added to allow quick population of meta data for Aconex and the Transmittal
  • We’ve restored and enhanced the Duplicate features, so you can easily duplicate a Profile or a format
  • We’ve added the ability to show the Revit model on the transmittal
  • Validation, Validation, Validation!!  All of our settings have had a tremendous amount of work done in the background to ensure the settings you use always work and won’t allow invalid information
  • More Advanced Naming Rules/Output Location functions including Prefix/Suffix, Default Values if a parameter is blank, Text alignment in file names, Padding out and formatting of parameters, specify fields as optional in a naming convention!  Again we will be generating some videos explaining how all this works and updating the help files.
  • Added settings to configure Paper Sizes, Issue Methods & Issue Reasons
  • Added an option for “Autodetect paper size” for PDF that works very similar to DWF.  NOTE: this is a work in progress and there are currently a couple of quirks with Revit that we are trying to work through with Autodesk.  If you have issues with this, just let us know and we can provide some assistance.

Here is a video just briefly showing some of the functionality:

Posted in New Features | Tagged , , , , | Comments Off on Xrev Transmit – Matrix Transmittals is here!

Xrev Transmit – New Naming Rules Functionality

For the past month or so we’ve been working on expanding the functionality of the naming rules system for file names and output location automation in the new release of Xrev Transmit (available very soon).  This is all based on various feedback and requests from our users.

We’ve recently added the following functionality:

  • Alignment of values
  • Formatting of values
  • Prefix & Suffixes to values
  • Nominating optional values
  • Specifying “Default” values

Alignment

This enables you to pad out a parameter value to a particular number of spaces, then left or right align the value.  This can be useful when you want everything to line up in Windows Explorer.  For example:

ProjectNumber-SheetNumber(Revision) could be configured with alignment to do this:

  • 10000-A001     (A) or
  • 10000-     A001(A)

In this case I’ve shown two examples of padding out the Sheet Number to 9 characters, one left aligned and the other right aligned.  Is this useful?

Formatting

We’ve always allowed the formatting of Date parameters to be overridden in a naming convention on a per instance basis.  We now also allow the formatting of Numeric values.  EG: you can pad a number out to 3 zero’s.

  • <Date:yy-MM-dd> becomes 26-09-13
  • <Number:000> becomes 001

Prefix & Suffix

You will now be able to choose to include prefixes and suffixes in naming conventions.  This is useful because if the value is blank or the parameter doesn’t exist the prefix/suffix doesn’t get placed.  For Example:

  • <ProjectNumber>-<SheetNumber>(<Revision>) used to be 10000-A001() if blank, with the new functionality you could write:
  • <ProjectNumber>-<SheetNumber><[(]Revision?[)]> which is 10000-A001 if blank or 10000-A001(1) if 1.

Optional Variables

One of the most common support requests we have is when someone has used a “shared parameter” in a naming convention, then that shared parameter doesn’t exist in the project and Xrev Transmit doesn’t know what to do as a result.  We now can handle this type of error by nominating Optional variables.  By simply adding a question mark it tells Xrev Transmit that it doesn’t matter if that parameter doesn’t exist or is blank, and it should just ignore it.

Default Values

Default Values are very useful, for applying a value override when the parameter is blank in Revit.  For example:

  • <Revision=0> means if the revision is blank to show it as Revision 0. OR
  • <Revision=Not For Issue> for a blank revision would just put in text saying “Not For Issue” in place of the Revision.

As we are still working on the new release, we’d love to hear any feedback on whether you’d find this useful or need more control over naming rules in any way?

Posted in New Features, New Release | Tagged , , | Comments Off on Xrev Transmit – New Naming Rules Functionality

Latest Family Creations – September 2013

Ever wanted some internal glazing and partitioning systems for Revit?  That’s what I’ve been working on lately for another manufacturer who sees the value of BIM and supplying high quality Revit content for their customers.

This one had me tossing up between the best approach to create them.  Should I use curtain walls or not?  Ultimately I chose NOT. Why?

  1. Curtain Panels aren’t particularly nice for scheduling.  We want to schedule the size including the frame.
  2. The way in which a curtain panel meets a mullion isn’t configurable enough, in this case we needed panels to overlap mullions.
  3. We could have avoided mullions and built in the frame into the panel, but as most of these systems integrate with steel and timber stud partitions this seemed like it was just making extra work for the end user with the only benefit being the ability to quickly place a number of windows very quickly.

So with that I created them all as wall hosted Windows/Doors:

Internal Partition Systems & Doors

Each System has numerous options that are controlled with simply Yes/No checkboxes.  Validation is done in the back end to ensure there are no illegal combinations.  These include Options for:

  • Shadowlines
  • Full Height
  • Head/Sill
  • Materials
  • Left/Right Joiners (for when you have 1 window hard up against another)
  • Corner Options
  • Number of Panels (for butt glass panels)
  • All ANZRS Door Parameter controls for Size (all formula driven so you only set the panel size)
  • Doors have additional options for:
    • Timber or Aluminium Panels
    • Grilles (including size options)
    • Vision Panels (including size options)
    • Mid Rails (including size options)
    • Wide Stiles
    • Guide and Track Options
    • Flush/Pelmet Head Options
    • Side or Top Fixing
  • Wall Types have:
    • Built in Skirtings
    • Built in Reveals for Shadowlines
    • Built in Ceiling Channels

Of course all the parameter fields have been populated, materials have been created for the 200 colours options available for Anodising and Powdercoating.

There are also a series of Face and Cavity sliders. These are designed to suit partitions of particular sizes.  EG: A stud of 90/92mm with a single layer of 10/13mm plasterboard either side.  As such I’ve built in validation into the door so it detects the finish and core thicknesses, if it isn’t with the tolerance a warning message is displayed in plan.  This required some trickery as if you don’t do it a certain way the door would break when there was no finish to one side.  Technically that’s correct, but the end user may assume the door is broken, so instead I allowed it to be placed and just provided the warning message.

Of course in Plan/Elevation we have appropriate Coarse/Medium/Fine detail so the documentation is clear and readable.  With consistent symbology.   At Coarse level we only see simply box sections for frames and single lines for the panes.

I’ve done my best to keep file size to a minimum, but given the number of options available there were some limitations to how small I could keep things.  Considering a single door can do so much it probably does what it would take 10 normal doors to do.  If the average door is 450KB, that equates to 4.2MB.  These Doors range from 400KB to 1.1MB maximum I’d say that’s a reasonable achievement.

Finally type catalogs have been created with all the most common sizes and configurations so you can easily select which configuration you want without the need to touch the parameters…

If your company needs help with family creation please don’t hesitate to contact us at Xrev Pty Ltd.  Just send us an email!

Posted in Services | Tagged , , , | 3 Comments

Revit MEP Content – Standardisation/Feedback

Lately I’ve been having to write a number of specifications for content creation for Revit MEP families.  As I’m not an MEP Engineer of any sorts, I rely on feedback from others.  When I do this, I don’t like to take the approach of near enough if good enough.  I’d prefer to do things perfectly!

Specifically HVAC including:

Dampers, Air Terminals, Evaporators, Condensers, Packaged AC Units

I’d love to get some feedback on what the users are after in these families?  Types of questions I have:

  1. Is there standard symbology for any/some/all of these elements, or does each company have their own symbology?
    1. If the latter, would you like to see some symbology included?  If so, can we agree on some standard symbology?
    2. Would you prefer no symbology so you can just embed your own?
  2. For things like fire dampers, would you prefer them hosted or Duct Accessories with the “break-in” ability?  Obviously we can have Slab or Wall Fire dampers, but in most cases as an MEP engineer you are working on linked architectural/structural models so I would assume make them wall or floor hosted would be pointless.  Making them face hosted is a possibility but which workflow would you prefer as there are Pro’s/Con’s of face hosted and break-in.
  3. What are the most critical parameters you’d like to be able to schedule in each of the family types?
    • NominalCoolingCapacity_ANZRS
    • SensibleCoolingCapacity_ANZRS
    • EquipmentNominalHeatingCapacity_ANZRS
    • TotalCoolingCapacity_ANZRS
    • TotalHeatingCapacity_ANZRS
    • NoiseLeveldBA_ANZRS
    • Operating Weight_ANZRS
    • Refrigerant_ANZRS
    • Height_ANZRS
    • Width_ANZRS
    • Depth_ANZRS
    • MinimumAirFlow_ANZRS
    • MaximumAirFlow_ANZRS
    • EquipmentAirFlow_ANZRS
    • ApparentLoad_ANZRS
    • PowerFactor_ANZRS
    • NumberOfPoles_ANZRS
    • Voltage_ANZRS
    • StartingCurrent_ANZRS
  4. What is your preference for connector settings?  Below is my attempt at a starting point:  (Please comment!)
Type System FlowC / Poles FlowD / Factor State LossM / Load Class Drop / Flow / Voltage / Load / Factor
Evaporator
Duct Supply Air Calculated Out Not Defined N/A
Duct Return Air Preset In
Pipe Sanitary Preset Out Not Defined 0
Pipe Hydronic Return Preset Out Not Defined 0
Electrical Power (Balanced) 1 or 3 Lagging HVAC As applicable
Condenser
Pipe Hydronic Return Preset Out Not Defined 0
Pipe Hydronic Supply Calculated In Specific Loss 0
Pipe Sanitary Preset Out Not Defined 0
Electrical Power (Balanced) OR 

Power (Unbalanced)

1 or 3 Lagging HVAC As applicable
Packaged Unit
Pipe Hydronic Return Preset Out Not Defined 0
Pipe Hydronic Supply Calculated In Specific Loss 0
Duct Supply Air Calculated Out Not Defined N/A
Duct Return Air Preset In
Pipe Sanitary Calculated Out Not Defined 0
Electrical Power (Balanced) OR 

Power (Unbalanced)

1 or 3 Lagging HVAC As applicable
Air Terminal
Duct Supply Air Preset In Not Defined Per details
Duct Return Air Preset Out Not Defined Per details
Damper LINK CONNECTORS
Duct Global Calculated Bidirectional Specific Loss Per details
Tap LINK CONNECTORS
Duct Fitting
Posted in Services | Tagged , , , | Comments Off on Revit MEP Content – Standardisation/Feedback